Thursday 29 October 2009

Result :-)

I have just gone on line to tax the ambulance as I need to move it next month for the work to the rear to be done. I put in the details at DVLA and RESULT £0.00 for 12 months.  I can only assume this is because it is still listed as an ambulance.  I suppose when it gets reclassified it will change. 


On a different note.  If you read back you will see I have been waiting for a boat project.  I got a call from the receivers disposing of the boat and I have to put in a sealed bid for opening on 1st November.  I have never done this before.  It's like a blind auction. 


This is the shell.

60' x 12' 

Lets hope I win the bid.  I would expect this to be an 18 month - 2 year project.


Edit to say I won the bid see the link.

Monday 26 October 2009

Off to O'Learys Cave

We are off to O'Learys motrorhome emporium tomorrow. According to many sources this place is an Aladdin's cave of goodies, ideas and inspiration. Certainly speaking the one of the chaps there they are very enthusiastic. Lets hope so. Its a 115 mile trip from our boat where we are staying for a few days over half term. Its another 100 from home. I am going to take a trailer "just in case".

http://www.olearymotorhomes.co.uk/

Sunday 25 October 2009

Readers to Followers

Hello readers.

My stats tell me there are quite a few reading this blog. It would be nice to know who you are.

If you hit the "Follow" button I will know.

Enjoy

Saturday 24 October 2009

Swivel on this. (These)

The swivel seats from the Renault Espace are now fitted.  The Espace seats only turn one way so it has been necessary to swap the driver seat and passenger seats over to get the required rotation.  The more eagle eyed of you will spot the seat belt mountings are on the wrong side.  I will fix this when I adapt them to receive the seat belt clip from the VW.  The Espace seats have mountings for either side so this will be easy.


It is now taking on a motorhome feel at last.

Having found my 110v transformer I thought its time to see if the ambulance battery charging system worked.  Pleased to report it does.  The unit can be seen under the passenger seat. I am going to keep this as it is a 40amp smart charger, I just need to find a small 240v - 110v transformer to tuck in somewhere. I did speak to the tech. support at the manufacturers to see if it had an option inside to switch it to 240v.  Sadly not.  But I was told this charger is about £450 +vat and for the price of a transformer it was worth keeping.  I agree.  The charger is charging both the start and domestic batteries.

Thursday 22 October 2009

Lots of Little Jobs Done & Some Rust Found :-(

A couple of days of messing around in the ambulance has seen a few changes.

I recently got hold of  2 Renault Espace front swivel seats.  I took the VW seats out and to my amasement the bolt holes width wise lined up perfectly with the Renault seats.  Not that this is going to be much use as they need to be raised 75mm to get the right height to drive but it does make the new brackets easy to design.  I pick them up tomorrow from a local sheet metal works.  I could have fabricated these but having them pressed will make a much more aesthetic finish.

Originally I was only going to have the 2 channels
but decided to weld in the cross bar in for
lateral rigidity.  Sprayed satin black.

I did try to use the base of the VW seats as these have a height adjustment as well, but even on the lowest setting they were too high, so 2 seats will be going on ebay soon.

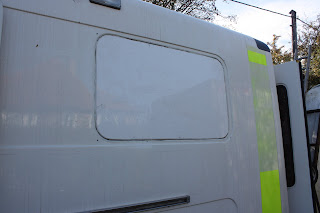
The near side of the ambulance had a window ambulance style.  Not only was it ugly it was also where a wall will be going so I have removed this and replaced it with some GRP sheet. A wooden frame screwed to the outside from the inside provided the support for the new panel until the glue and reinforcing strips have cured.


External support frame.


Temporary internal bracing.


Job done, just needs finishing with filler.


Other things done include re-wiring the front high level lights, refitting the now cleaned head lining, repositioning the A/C unit in the overhead space, fitting the 240v inlet,

Fitted where the  original 110v was.

putting the floor liner back in and changing the start battery.  The latter as luck would have it was the exact same one I had already from my car.  Reason.......  electrical fault was misdiagnosed as a failing battery, a new battery didn't fix it.  The fault was eventually diagnosed as a faulty A/C sensor.  So that turned out well in the end.

The step insert on the drivers side was removed when I took out the floor liner and there was a bit of rust there that need some treatment, at the time I was not able to unscrew the passenger side so today I drilled the heads off the screws and removed it.  Glad I did as below it was a large area of rust that needed cutting out.  


Rust cut out ready for welding.

Tuesday 20 October 2009

Decisions Decisions

I have decided not to go with getting the rear quarters repaired.  Instead I am going to get a very talented chap to put a GRP rear from a caravan on the rear of my ambulance.

Its not going to be a cheap job but I have every confidence in the finished result and I know long term I am going to be happier with it.  IMO it changes the body from an ambulance to a motorhome.

I know it might be considered cheating by getting someone else to do some of the work, but something like this is well beyond my talents so I figure that something this important should be be left to the experts.  The same goes for the spray job when the time comes.  The rest will be me.  Honest :-)

No ambulance picture of any progress so here is where we went for the weekend.

The Falkirk Wheel

Tuesday 13 October 2009

One thing leads to another.

At the moment it seems like every little job has a series of other jobs that have to be done first.  It was the same when I refitted our narrowboat and it has always been the the same on property renovations I have done.  Still, all the prep work needs to be done in order for the fun part of re-creation starts, which is after all the point of the project.

I thought I'd better pay some attention to the various knocks and dings the ambulance has had.  Initially they looked quite superficial.  I took the whole ambulance to a friend that 'does' GRP to have a look at.  After the normal umm and ahhs etc. he decided the job was actually a lot more than it looked on the surface.  The biggest problem being that it was impossible to get behind the holes to form a base for a good repair, additionally as the damage had been left so long water had got in and does what water generally does to GRP and there was a fair bit of de lamination probably due to frost.


The damage in the photos give the impression that it is just superficial.

The best solution I could see was to remove the quarters so a proper repair can be made. After much deliberation I decided I could use the natural lines in the bodywork for the cuts and they would give me a "hide" to refix it all back. So this it what it looks like now.


These are the part going off for repair.


Whilst under the ambulance I looked for suitable mountings for a towbar.  Looks very much like this will be fairly straight forward, which of course it won't be once I start.

Finally (no surprise) there was the now obligatory wiring to cull.  This time it was behind the O/S light cluster but was soon dealt with.

Saturday 10 October 2009

Ambiwlans

Since the last blog I have been stripping out yet more wire.......... Yeh its still coming out!  Much of this was to do with the Eberspacher heater. and the rest of it was the ends from the large control panel shown earlier and wiring under the seats.  I think this is pretty much it, but never say never.

When I got my ambulance it had the front sign missing.  It was there on the auction picture, but when I got home it was missing.  I can only assume it was ripped off on the way home. We'll never know.

Initiall I thought I could make a replacement one with some steel sheet. I got bit cut and tried to fit it.  Oh no! what can't be seen initially is the way it fits.  The flat sheet won't work as its a compound curve, a bit like trying to make an orange skin being made flat, but in reverse.  Can't be done!

I had to bight the bullet and get the one from UVG.  The reason its in Welsh...... the Welsh ones are cheaper and its going to be sprayed anyway. That said still not cheap for a bit of formed plastic.  So warning if you have a UVG Prima body don't break the front!! its a sod to get to and to get the old adhesive of.  In total to replace this took the best part of 2 hours.


The other thing I have been doing is deciding how I am going to set it out inside and researching  equipment.  This is taking ages as one idea leads to another and then an evening has gone. I am not sure if I am going down the doner caravan route at the moment.  More on that when I decide.

Thursday 1 October 2009

Lochs & Quays

Well locks & keys actually, but as I have a narrowboat I couldn't resist.

I have now sorted out the central locking to the side door after a bit of over culling the wiring.  When I got the ambulance it had no key for the side door lock.  A quick call to the VERY helpful spares dept. at UVG quoting my body number I was furnished with a key number.  The side door lock is from a transit as I suspect is the the sliding gear.

I took the key number to a local key cutting shop and in a few minutes I had a key.  The chap in the shop said he could cut a Ford tibbe key just by looking at it.  Hers how:-

Look at a tibbe key from right to left, with the key flat and the plastic on the right, the widest part of the key is the code we're looking at. Imagine this piece to be divided into six segments, looking at the key flat, each of these segments has a degree of slope cut into it, no slope is no.1, slight slope is no.2, medium slope is no.3, max slope is no.4.  If you look carefully enough you'll get your key number.